Troubleshooting
Here are the answers to some common issues. If you have a problem not covered here please get in touch with the Data Analytics Team at dat@leeds.ac.uk.
- Citrix Workspace isn’t showing in Software Centre
- I need to update my version of Citrix Workspace
- The laser.leeds.ac.uk website fails to load
- My VRE won’t start: Cannot start desktop
- My VRE won’t start: Failed with status 1030
- The VRE hangs on ‘Connecting…’ and closes
- Access LASER VRE on Linux machine
- VM inaccessible shortly after Windows software updates forced reboot
- My session has timed out, how do I press CTRL+ALT+DEL to unlock?
- App windows in my VRE are white and borderless, which are difficult to distinguish when they overlap
- Some apps are missing from Software Centre in my VRE
- PackagesNotFoundError: The following packages are not available from the currenet channels:
- Anaconda Navigator is slow to open (in online mode)
- Change Jupyter Home Directory
- I can’t see R: drive
- My software installation failed in Software Center
- Where can I find the computational spec of my virtual machine?
- Why is my LASER desktop display a different resolution to the desktop I use to access LASER?
- How do I restrict folder access to specific project members?
- There’s a cost discrepancy between Azure Portal & LASER Dashboard
- LASER login failure: You cannot log on using a smart card
Citrix Workspace isn’t showing in Software Centre
If Citrix Workspace isn’t in Software Centre and youre using a university computer on campus, please contact DAT for support. If you’re using a university laptop remotely, it’s likely that your Software Centre needs to connect to the campus network to update.
If you’re working remotely, connect to the university VPN and Software Centre will update. The update may take 30 mins or longer to complete. If it doesn’t update quickly you may be able to force the update by following our guide to syncing Software Centre.
If Software Centre is still not showing Citrix Workspace, contact DAT for support.
I need to update my version of Citrix Workspace
- If you’re using Citrix installed on a personal device, or installed on a university device via Software Centre, you should be able to update Citrix Workspace yourself.
- If you’re on a university device and can’t update Citrix by following the below steps, uninstall Citrix Workspace and reinstall via Software Centre. If IT installed Citrix Workspace for you, it’s possible you’ll need their help to uninstall.
- Go to the system tray in the bottom right corner of your screen and right click on the Citrix Workspace icon to open the context menu.
- Select “Check for Updates”.
- A new window will appear telling you whether you need to update Citrix. If you do, download the update and wait for it to complete.
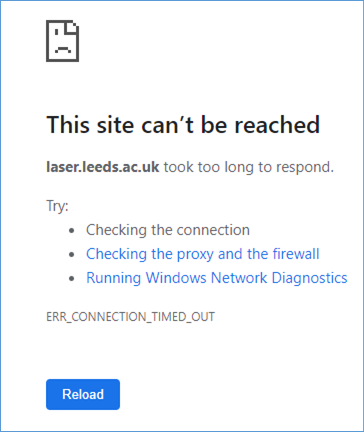
The laser.leeds.ac.uk website fails to load
If you receive the below error when trying to connect to https://laser.leeds.ac.uk please check to make sure you are not logged on to the University of Leeds VPN. If you are connected to the VPN then you will not be able to connect to https://laser.leeds.ac.uk.
If instead you get an error reporting either “Cannot complete your request” or “Connection failed with status (unknown client error 1110)”, then try connecting to LASER using an incognito/private browser window. If this succeeds, you’ll need to clear your browsing history, cookies and cache to successfully access LASER from a regular browser window.
My VRE won’t start: Cannot start desktop
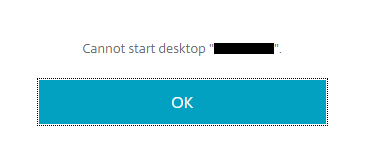
If you see the error message “Cannot start desktop” then chances are good that another member of your team is currently logged in to that specific virtual machine. Try another VM if there is one available within the VRE, or check that no-one else is currently logged in.
A VM will remain ‘occupied’ even if the user has disconnected.
Simply closing the window (‘Xing out’) will disconnect the user from the session. When disconnected the session remains active and running; users will need to log off or shut down to vacate the machine so that someone else can log on.
The below issue has now been resolved as of 2023-06-05
If you see the error message “Cannot start desktop” even though the VM’s status is ‘Stopped (Deallocated)’ on the Azure Portal, you are likely affected by an issue that is preventing Citrix Storefront from starting and stopping VMs in LASER.
Here are two simple steps to resolve:
Log in to the Azure portal and start the VM. Ensure that the status changes from ‘Stopped (Deallocated)’ to ‘Running’. Follow this guide on how to start the VM on the Azure Portal.
Go to the LASER storefront and log in to LASER.
Please Note: Make sure to manually stop the VM on the Azure platform when your session is finished to avoid unnecessary costs.
My VRE won’t start: Failed with status 1030
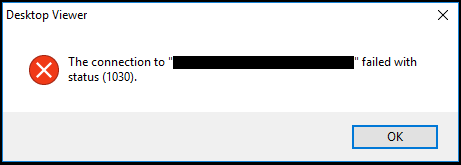
If the VRE looks about to open in a new window but then it crashes and you see the error message “The connection failed with status (1030)”, this most likely means you will need to update the Citrix client on your device to the latest version of Citrix Workspace. IT Services will be able to assist with this if you do not have the necessary permissions on your device. Before updating Citrix you might try resetting Citrix by right-clicking the Citrix icon in your system tray > Advanced Preferences > Reset Citrix Workspace. If this doesn’t resolve the 1030 error, or you can’t find the Advanced Preferences, submit a request to have Citrix updated.
The VRE hangs on ‘Connecting…’ and closes
When you first click on the VM in the storefront and you get the wheel spinning around, this has sent a command to Azure to power up the VM. Once the VM is powered up in Azure and available, the .ica file is downloaded in your browser.
The .ica file, this file contains config and connection information for Citrix workspace application to make a connection to the VM. Once a connection has been made, then VM window then logs your in and displays the legal notice which users have to accept.
If your failed session sat on the connecting screen that tells us that the Citrix application on your computer could not make a connection to the VM. This could be any number of reasons. A weak internet connection would cause this, issues with the Citrix workspace application on your computer, or in fact any range of issues on your computer that would result in a connection not being able to be made.
After confirming you have a strong internet connection please contact a member of the DAT who will assist.
Access LASER VRE on Linux machine
The steps below have been tested using Ubuntu OS and Firefox browser:
- Ensure versions of Ubuntu, Firefox and Citrix Workspace are up to date
- If you don’t have Citrix Workspace:
- Open the Citrix Workspace for Linux download page and go to the latest version
- Scroll to Available Downloads > Debian Packages > Full Packages (Self-Service Support) > Citrix Workspace app for Linux (x86_64)
- Download and run the .deb file (if you’re not running Ubuntu, you may need a different file)
- Go to https://laser.leeds.ac.uk and login.
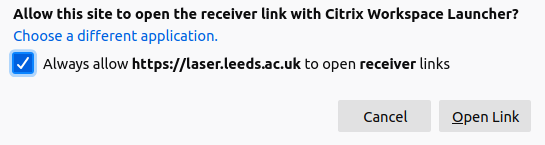
- Select Detect Receiver
- Check box to always open receiver links:
- Select Already installed
- Open VRE from Storefront. It will download an ica file.
- In dialog box on what to do with ica file, tell Firefox to always open with Citrix Workspace. Select OK:
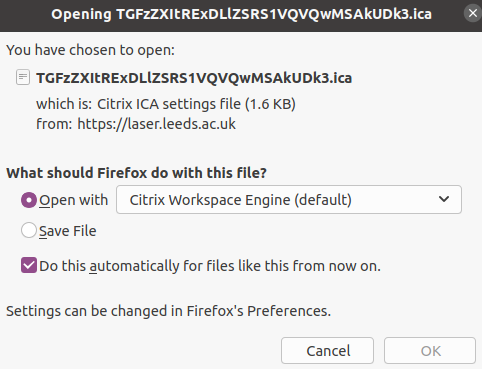
- The VRE will then open. In future, your browser will know to automatically open the VRE when an .ica gets downloaded.
- If you get an SSL Error 61 preventing you from opening your VRE:
- Open Terminal
- Run
sudo ln -s /usr/share/ca-certificates/mozilla/* /opt/Citrix/ICAClient/keystore/cacerts - Type your password to authenticate (note that this requires admin rights)
- Close Terminal window then retry LASER VRE login
VM inaccessible shortly after Windows software updates forced reboot
Your virtual machine must apply the same software updates as any Windows OS computer. This will occasionally require the VM to be restarted. When the restart is initiated your desktop window will close. However, the VM is still running and will show as running in Azure Portal. Keep it running to allow updates to complete.
If you try to connect to your VM shortly after the restart you may get the “cannot start desktop” error. This most likely means Windows is still installing its updates, which can take some time to complete. Once the updates have completed you should be able to reconnect to your VM as normal. If you still can’t reconnect 45 minutes after the restart was initiated, please contact DAT for support.
My session has timed out, how do I press CTRL+ALT+DEL to unlock?
VREs lock after a period of inactivity for security purposes. At the top of the window for your VRE desktop you should see a small black bar. Click the bar to expand a menu that includes a CTRL+ALT+DEL option. Click this option, select the password field that appears and input your password to unlock the session.
App windows in my VRE are white and borderless, which are difficult to distinguish when they overlap
You can change the display settings and themes in your VRE’s desktop. To display app windows with clearer boundaries, go to Settings by typing settings in the taskbar search. Go to the Personalization section and select the Colors tab. Scroll to the bottom of the page to find a checkbox called “Title bars and window borders”. Check this box and to fill the title bars and borders of app windows with the accent colour selected in the colour block. You can choose a different accent colour if you wish.
Some apps are missing from Software Centre in my VRE
If only a few or no apps are showing when you open Software Centre in a VRE, your virtual machine needs to synchronise with the University’s Software Centre service. This can be resolved by leaving Software Centre open for a while to allow the sync to happen. However, it can take 15 minutes or longer. To force the sync, follow the below steps while keeping Software Centre open:
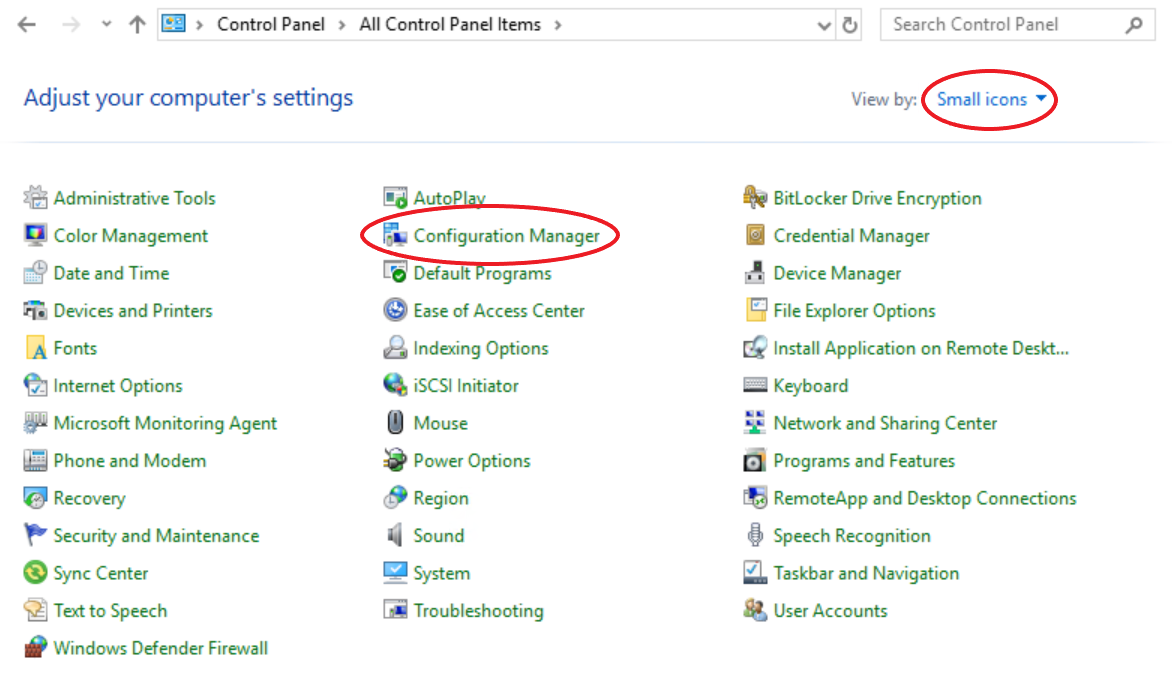
- Open Control Panel by typing “control panel” into the Start Menu search bar
- Open Configuration Manager (you may need to change the view in control panel as shown below)
- In Configuration Manager, select the Actions tab
- In the list of Actions, select “Application Deployment Evaluation Cycle” and click the Run Now button
- Then select “Machine Policy Retrieval & Evaluation Cycle” and click the Run Now button
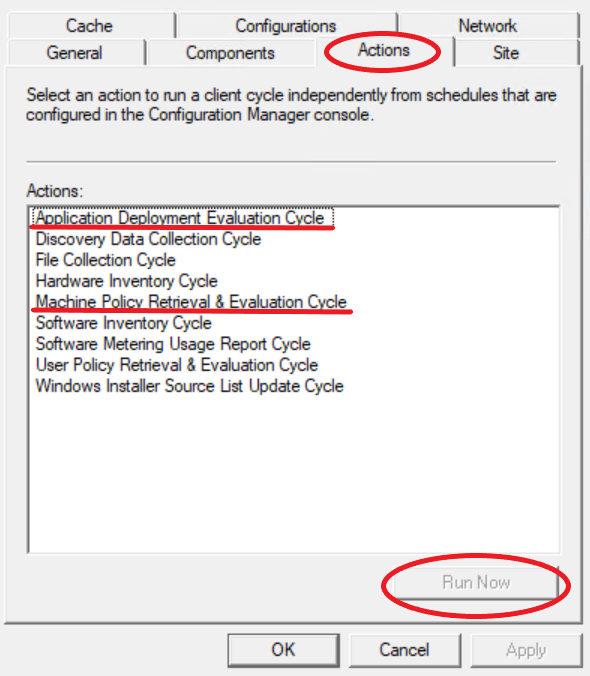
- Click Apply then OK to close Configuration Manager
- Within the next minute or so all apps should appear in Software Centre. If not contact DAT for support.
PackagesNotFoundError: The following packages are not available from the currenet channels:
You may encouter this challenge with error message above when trying to install some python packages via the conda command prompt within your VM.
There are two possible ways to solve this:
1. By finding and installing the package through the Anaconda Navigator : following these steps
Open Anaconda. 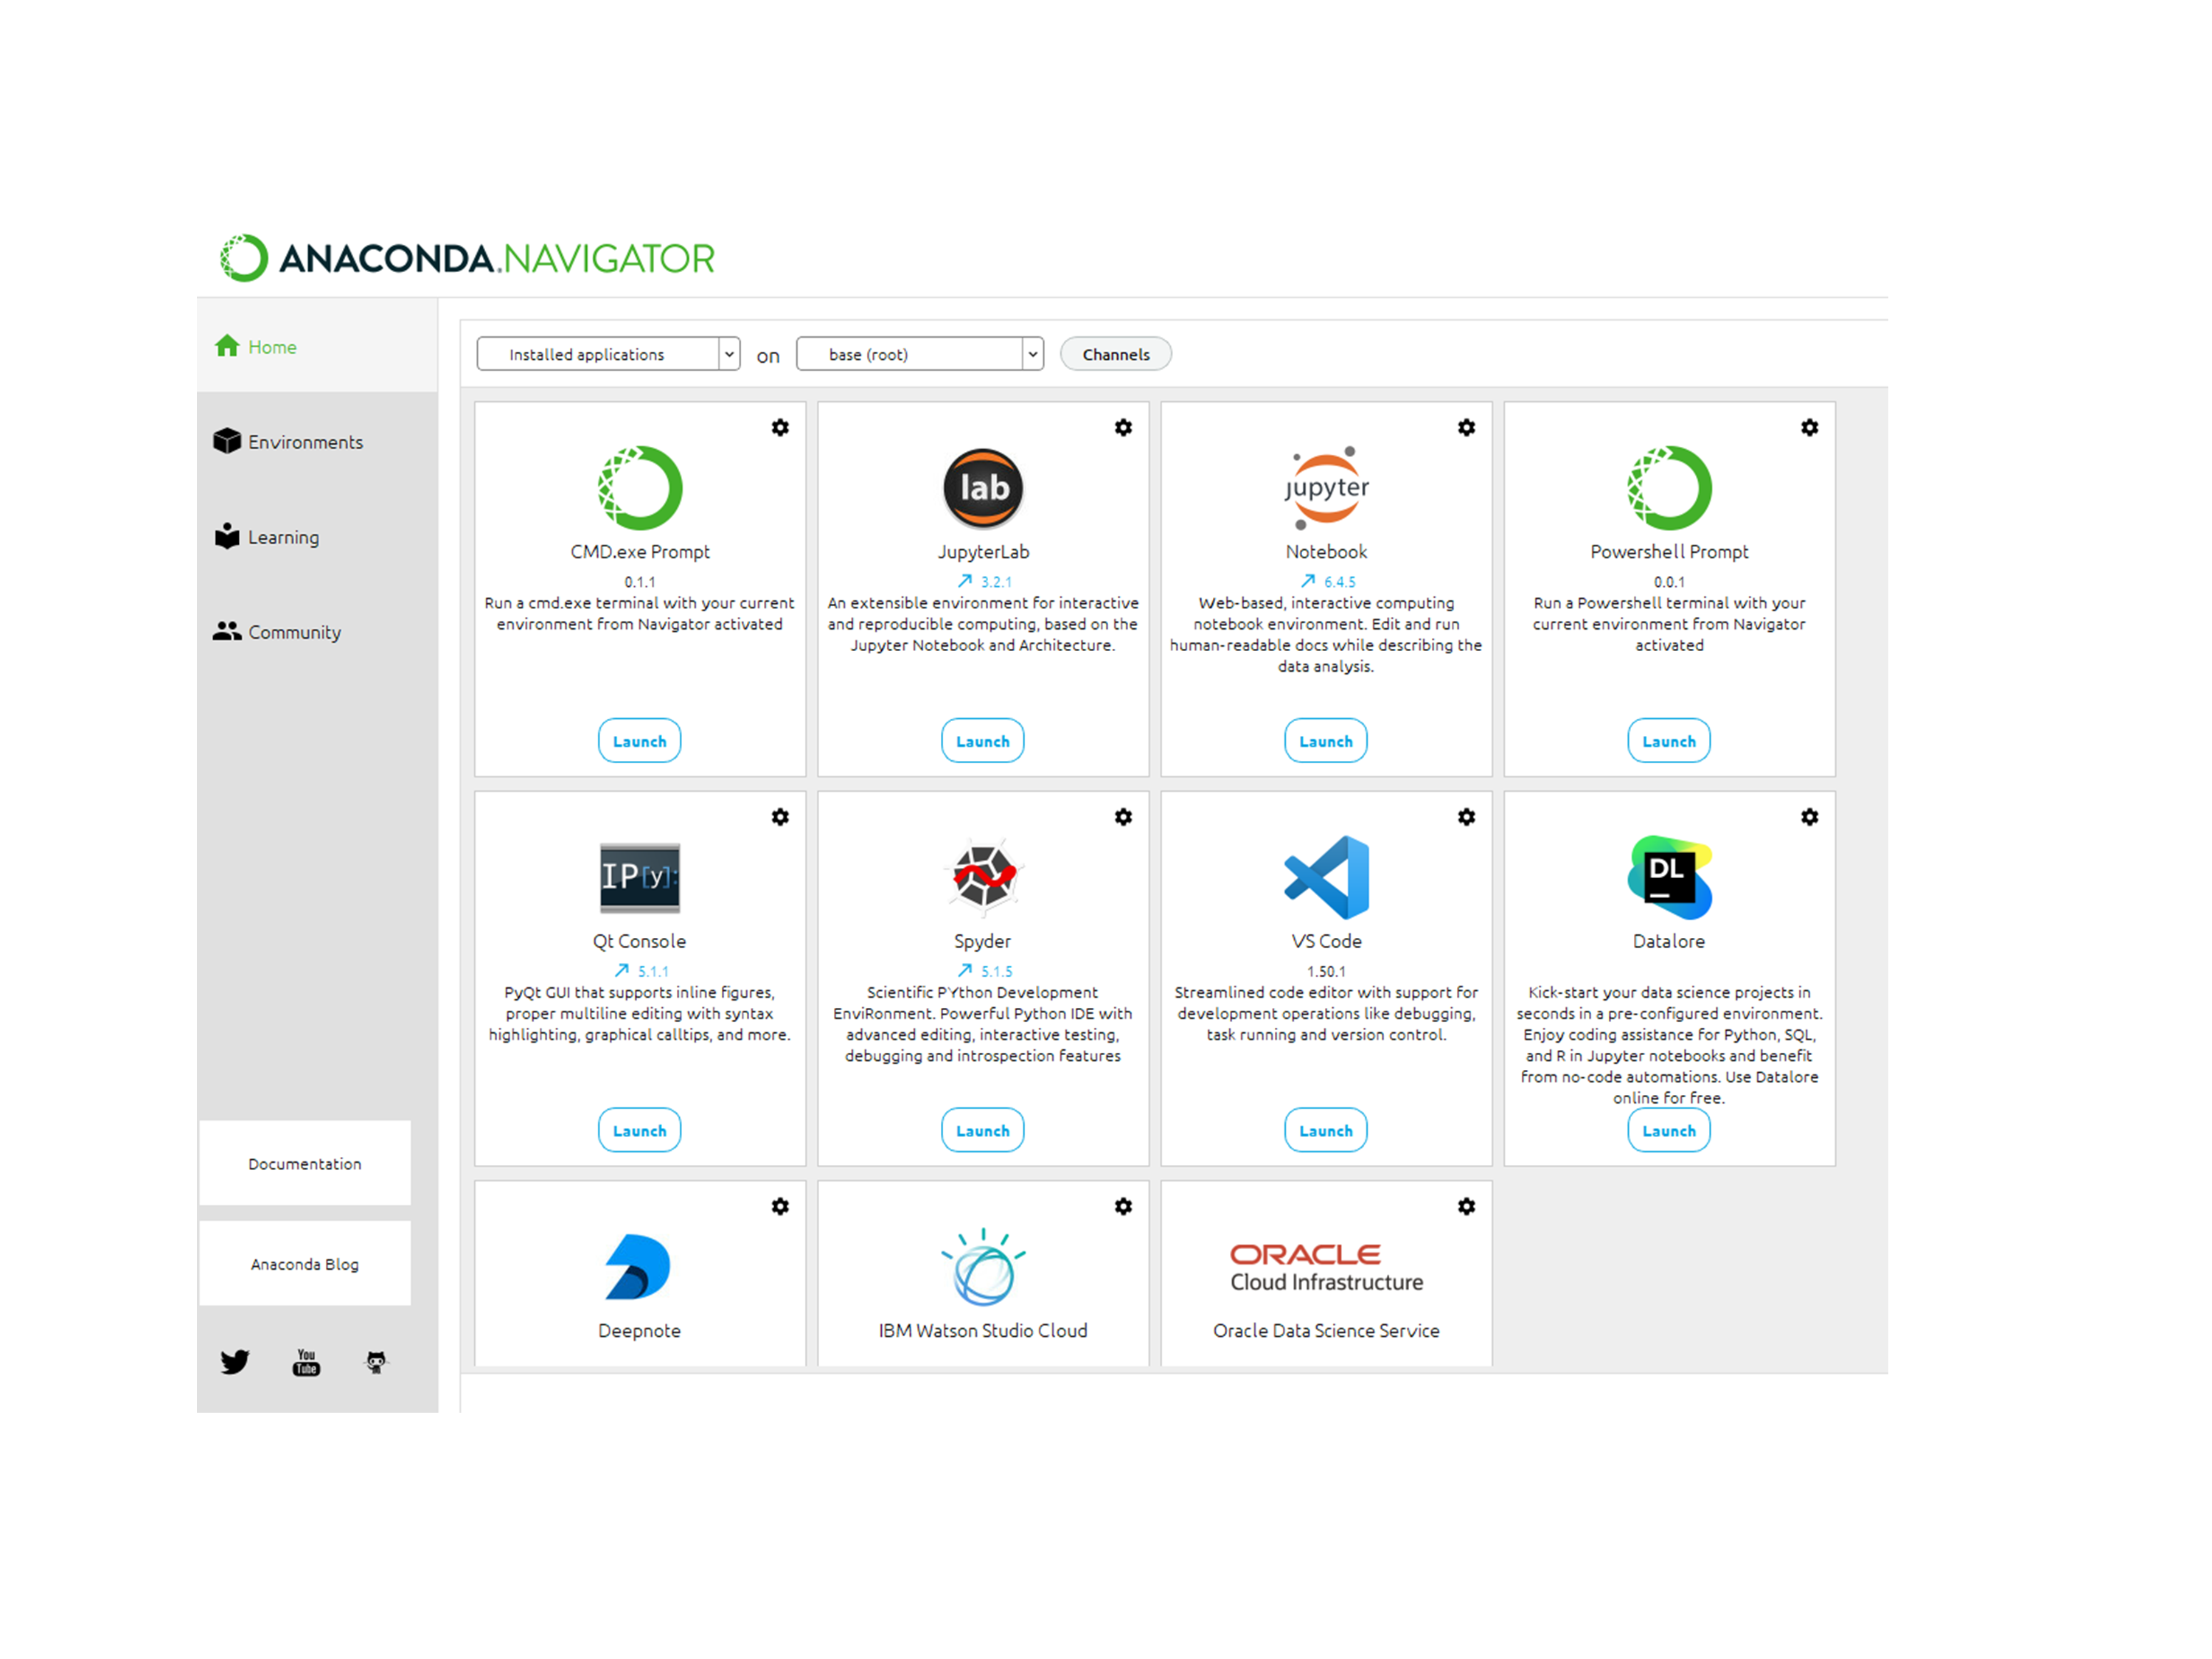 Go to Environments tab just below the Home tab and from there you can check what all packages are installed and what is not.
It is very easy to install any package through anaconda navigator, simply search the required package, select package and click on apply to install it.
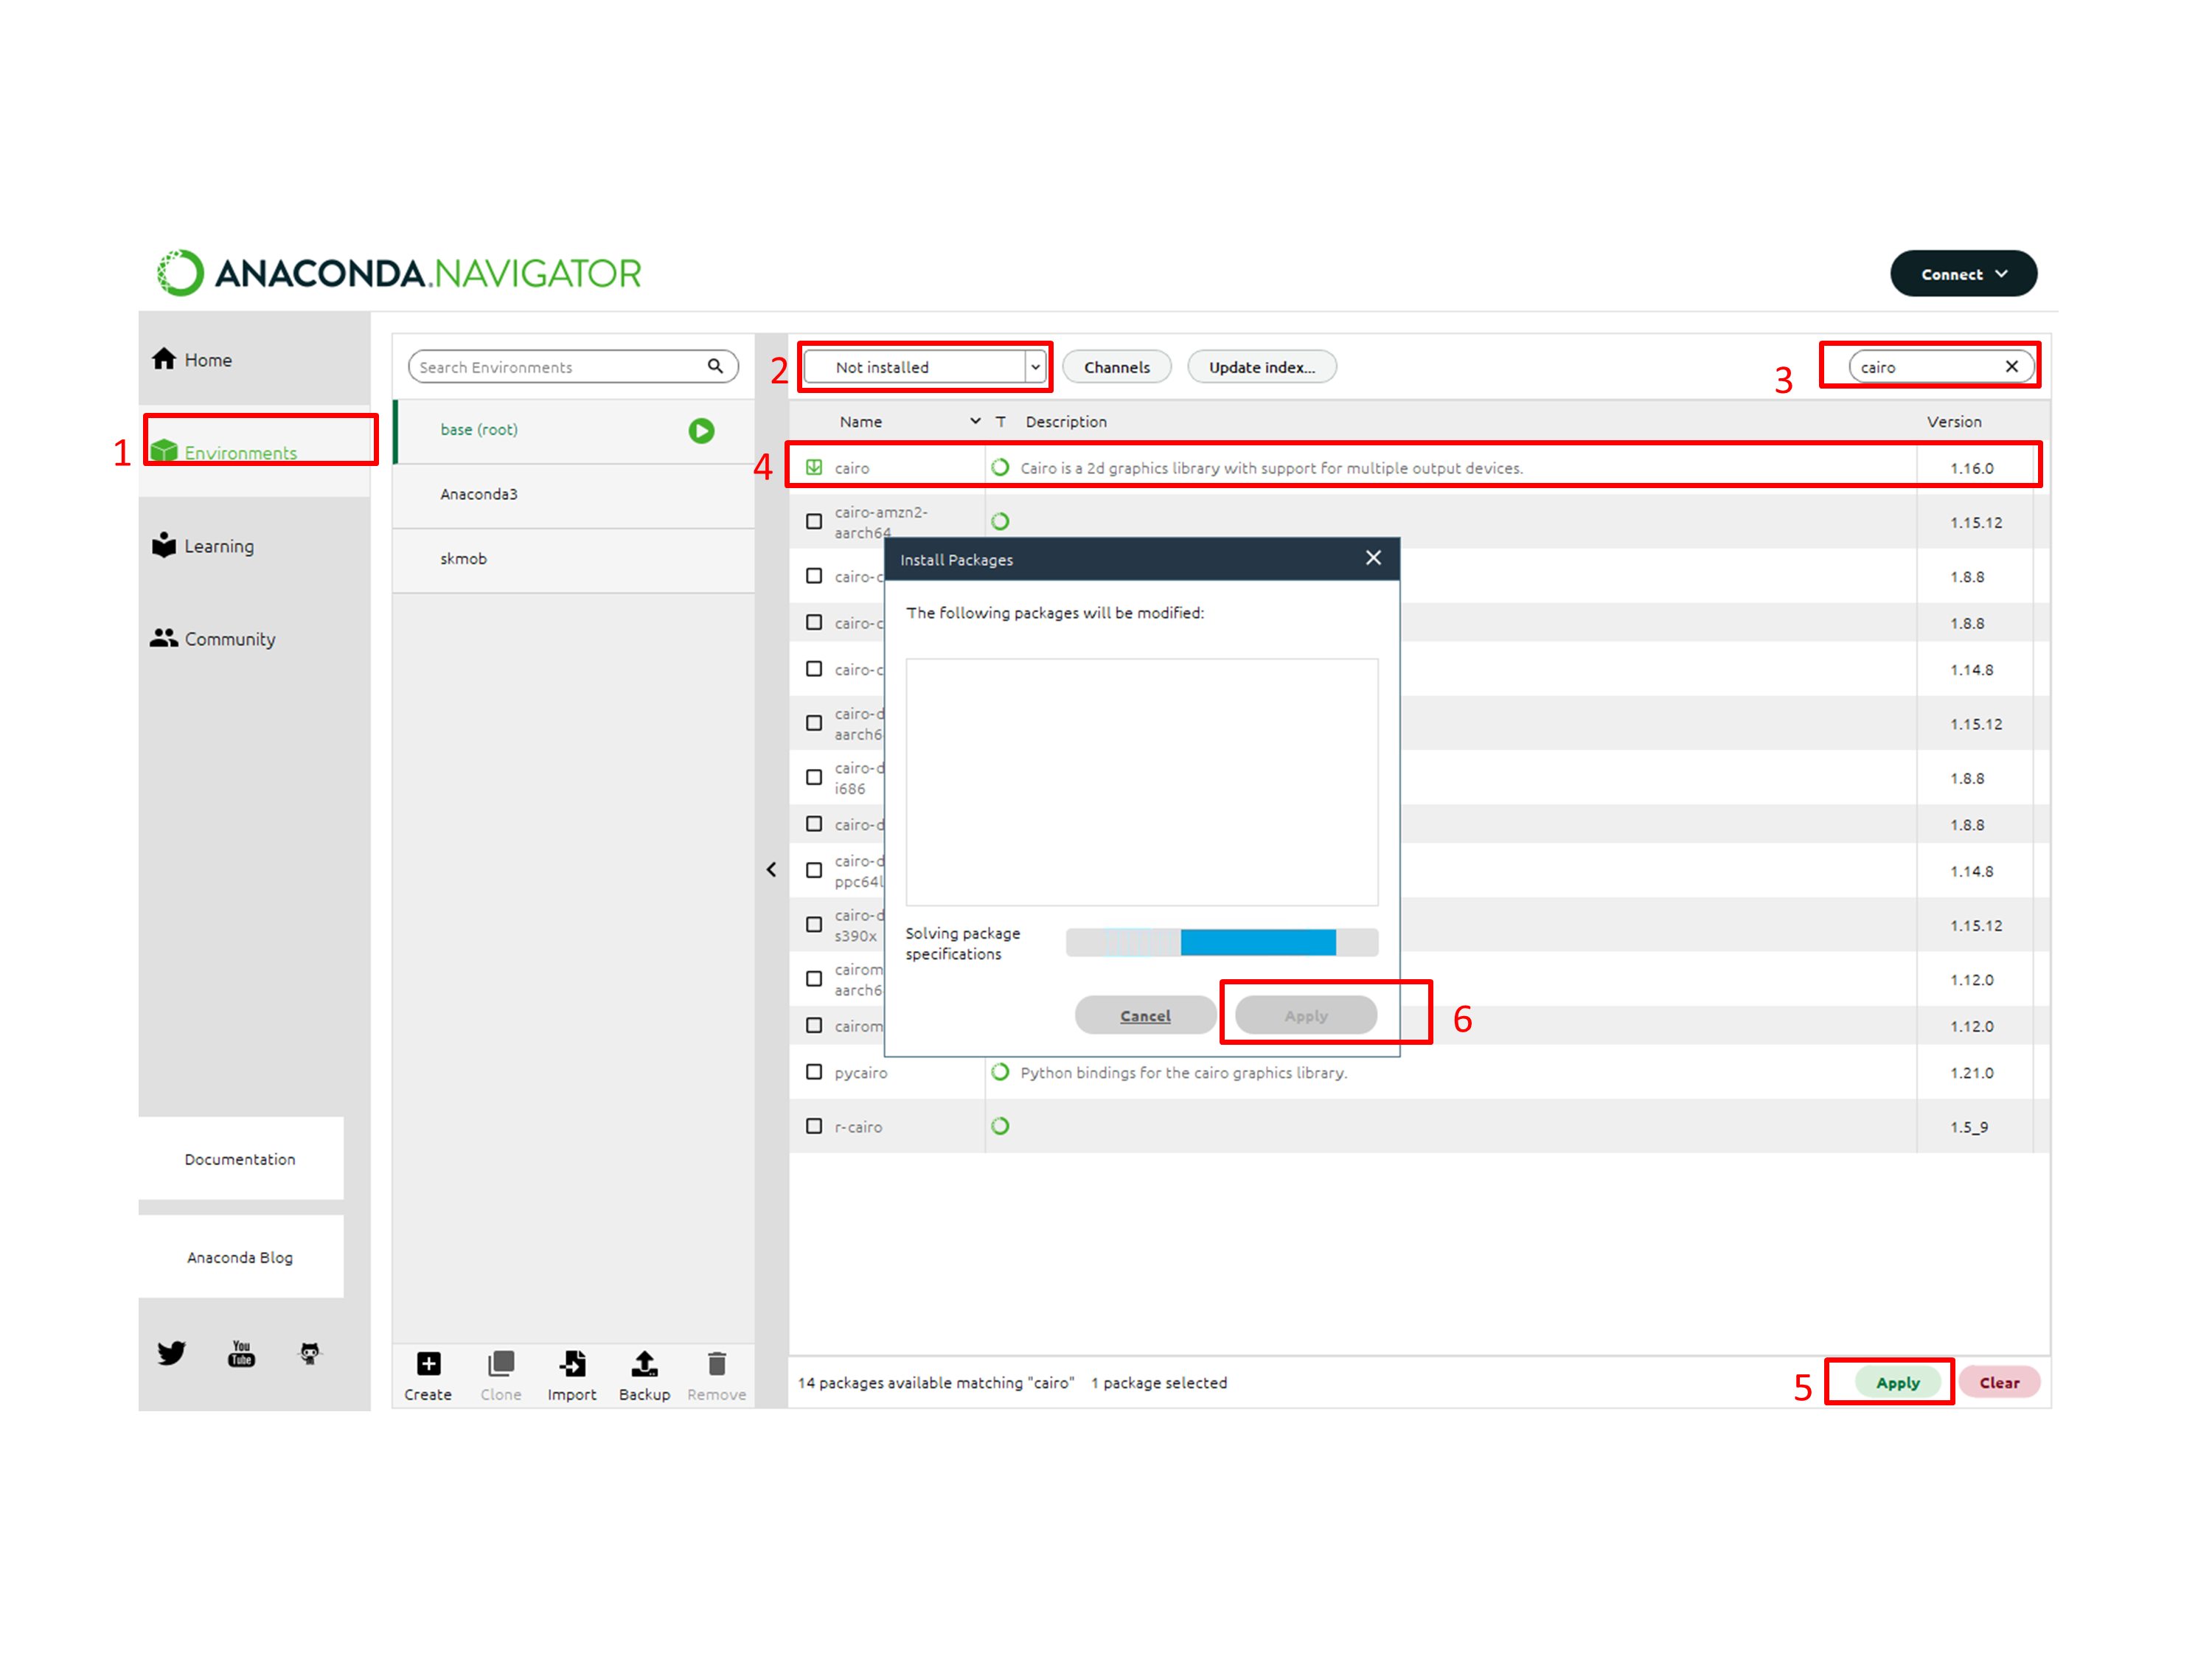
- Select base (root) or any other environment you’re using
- Select Not installed from the drop down menu as in in red box #2
- Search for the packages you want as in in red box #3
- Slect the specific package as in in red box #4
- click on Apply as in in red box #5 and #6
 Import package in your IDE and use as normal.
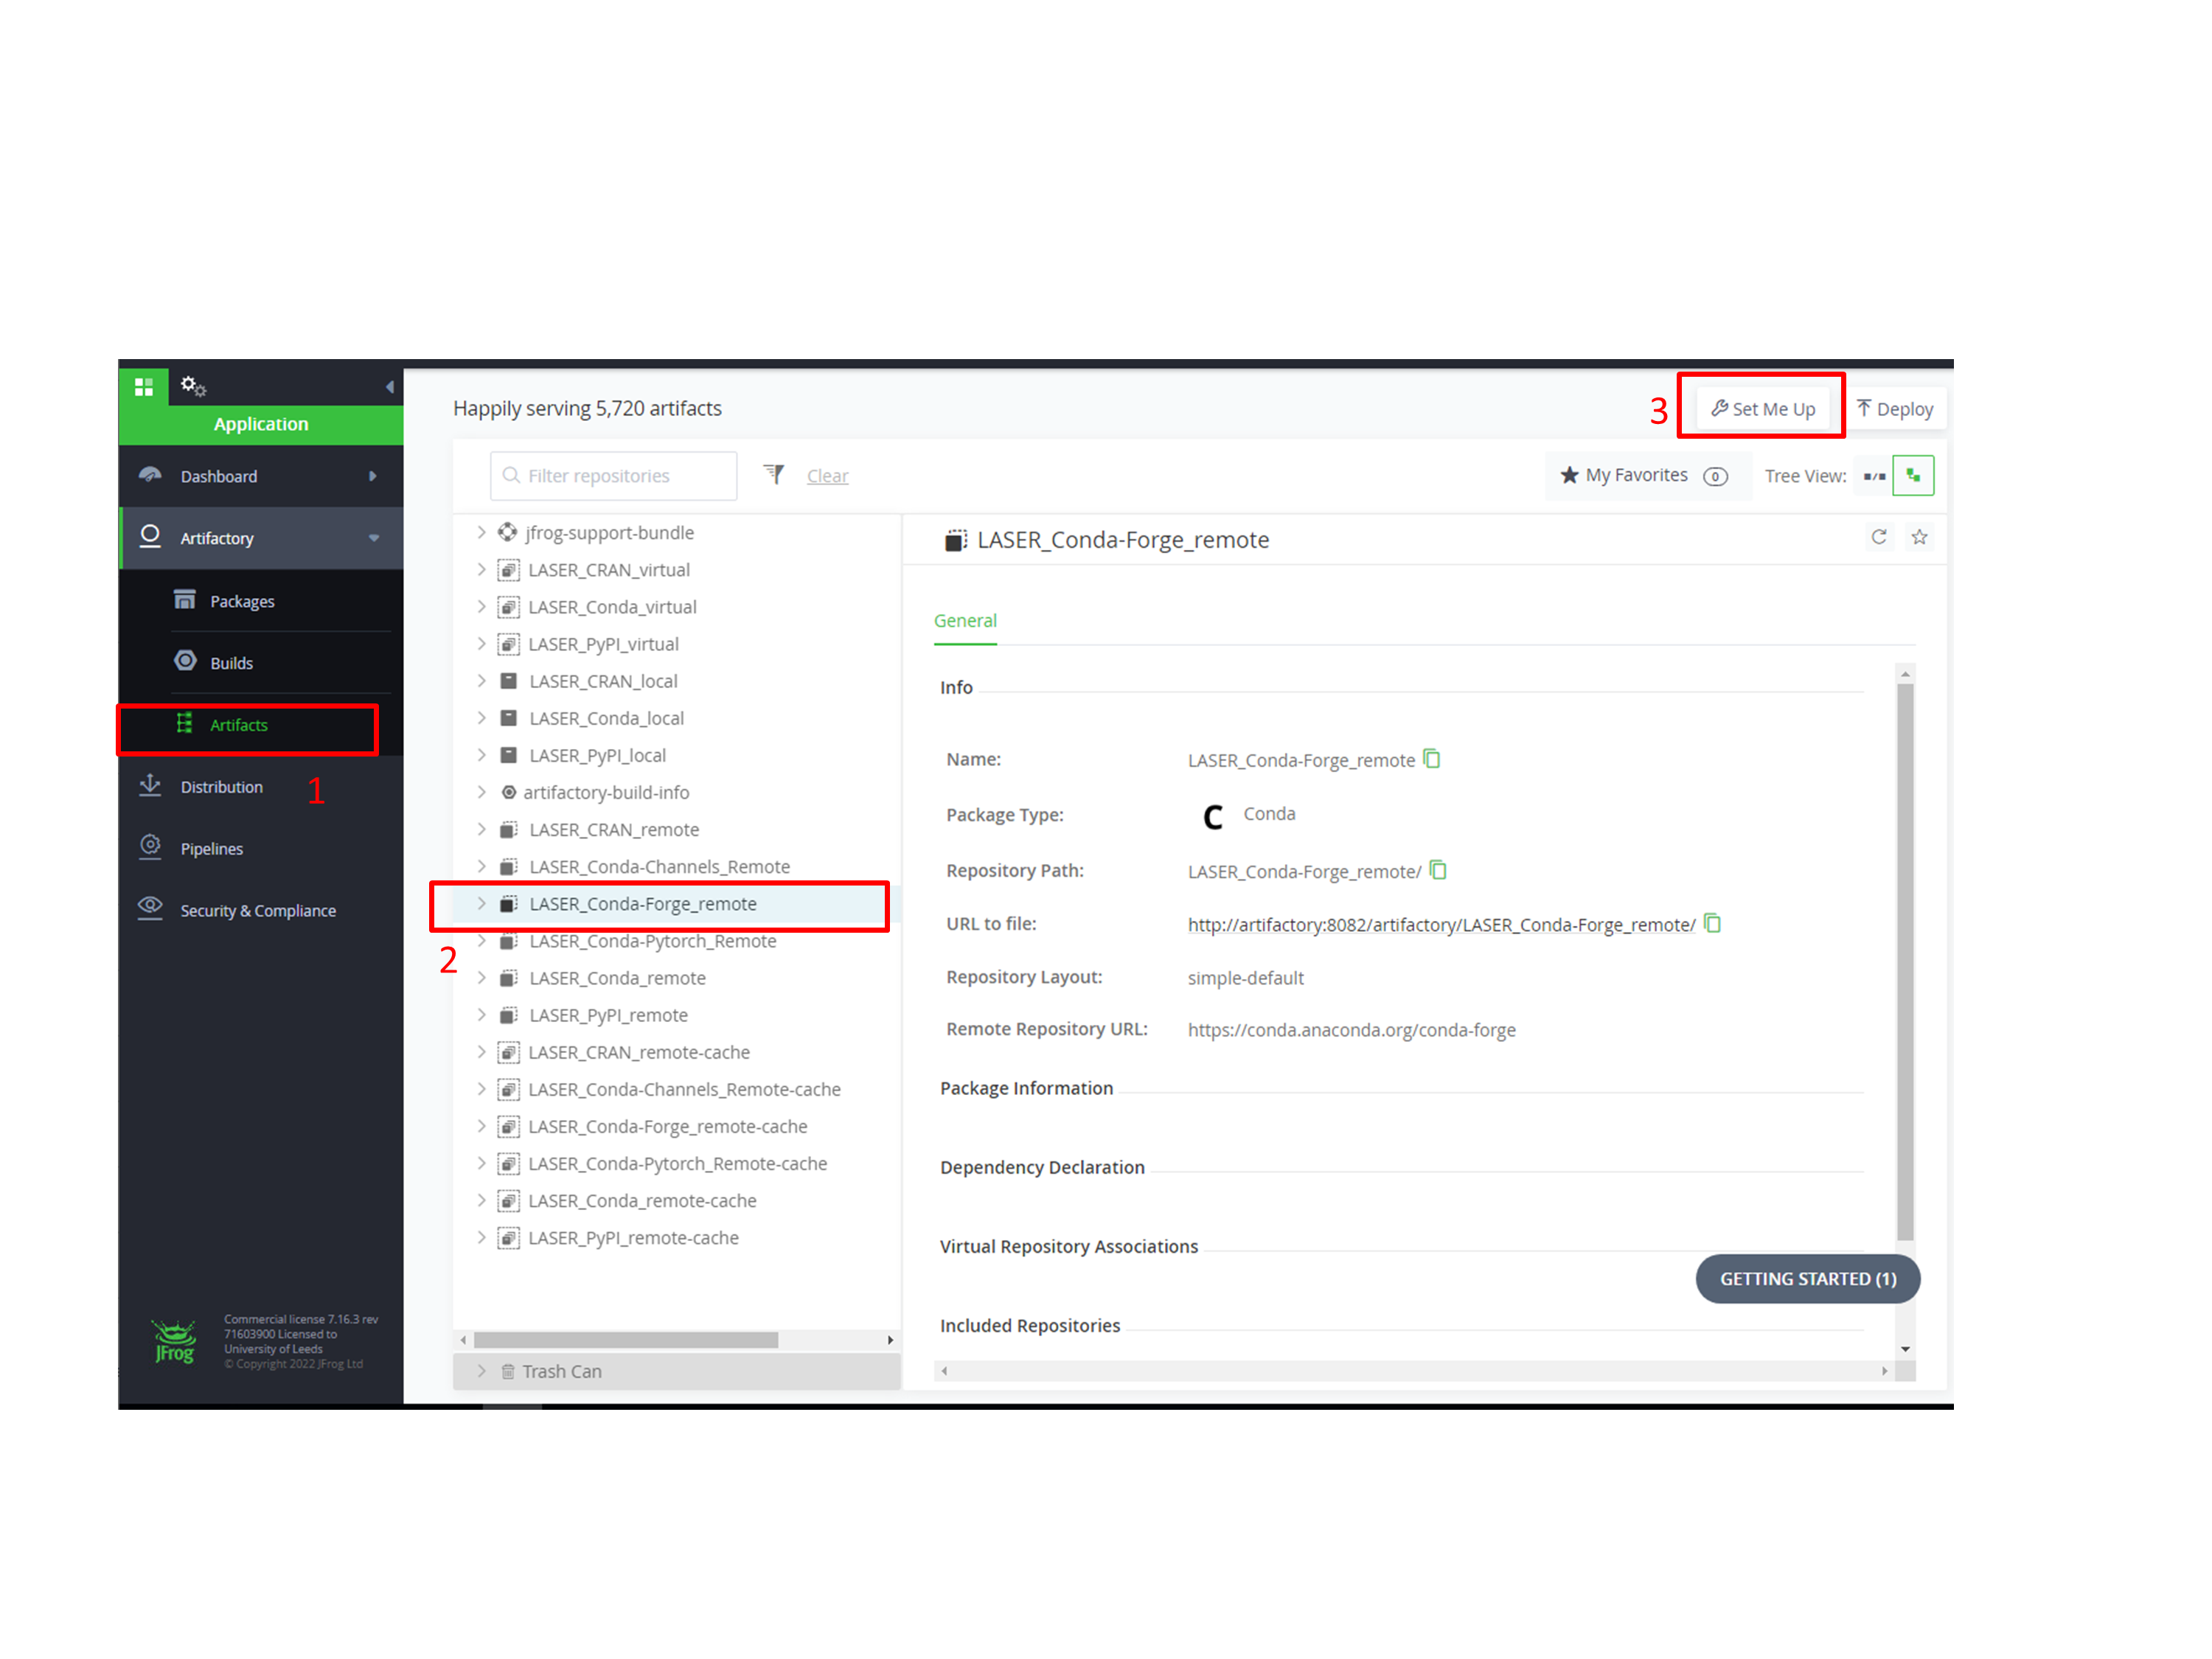
2. Select LASER_Conda-Forge_remote during Artifactory setup - Here’s a guide on Artifactory Set up from our website. Setting up Artifactory Follow step #1 to #3 when setting up your Artifactory
 Import package in your IDE and use as normal.
Anaconda Navigator is slow to open (in online mode)
When you first open Anaconda Navigator in a VRE, it will take some time to load. This is because the VRE is an offline environment and Anaconda Navigator expects an internet connection. You can improve your user experience of Navigator in the VRE by enabling offline mode.
After loading Anaconda Navigator, go to File > Preferences (shortcut CTRL+P).
Check the box to “Enable offline mode”, then select Apply and close the preferences pane.
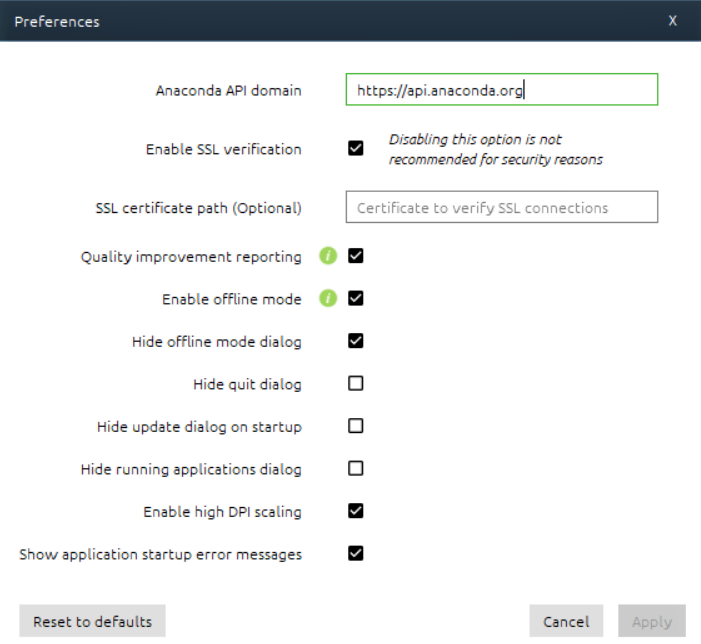
You should now see “Working in offline mode” appear in the top right. Offline mode should persist when you open Anaconda Navigator again.
Change Jupyter Home Directory
By default, Jupyter Notebook will start up with C:\ as its home directory. Only files within C:\ will be accessible using the Notebook Dashboard. You most probably will want to store your notebooks in your VRE’s shared storage (N:\), where your data will also be stored. To view N:\ in the Notebook Dashboard, you can simply change directory to N:\ before starting jupyter notebook:
- Open Anaconda Prompt and activate your conda environment using instructions above.
- Change directory to your VRE’s shared storage by typing
N:and hitting the enter key. - Your prompt should change to
N:\>. - Type
jupyter notebookin Anaconda Prompt and hit enter to open Jupyter Notebook.
The instructions above are simple but will not persist, meaning you must change directory to N:\ every time. To permanently make jupyter notebook open showing N:\ as your home directory, perform the following steps:
- Open Anaconda Prompt and activate your conda environment.
- Run
jupyter notebook --generate-config. - This writes a file to
C:\Users\<username>\.jupyter\jupyter_notebook_config.py.
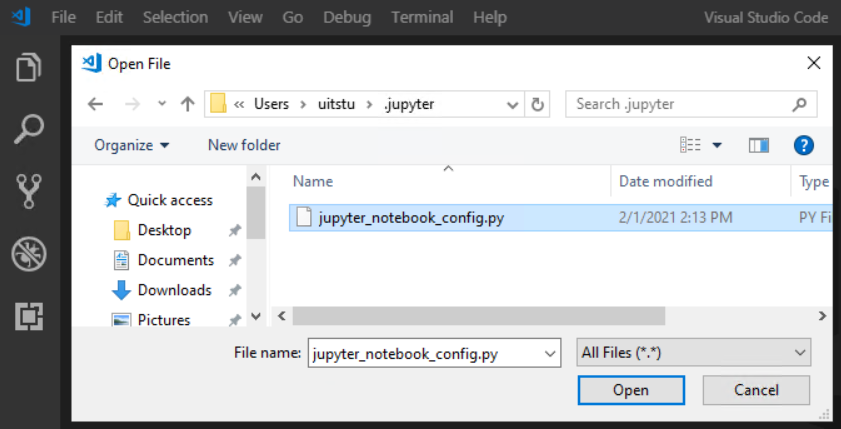
- Open this file in an editor and search for the
c.NotebookApp.notebook_dirconfig setting. - Put the file path for your desired home directory in the empty string, using forward slashes. E.g.,
N:/ - Uncomment the setting by removing the hash (#).
- Where the line previously was
#c.NotebookApp.notebook_dir = ''will now bec.NotebookApp.notebook_dir = 'N:\'or similar. - Save the change and close the file.
- Run
jupyter notebookin Anaconda Prompt, while your environment is active, and the Notebook Dashboard should appear showing your chosen home directory in the Dashboard file manager. - This setting will apply for your user only, on that VM only. Another user, or the same user in a different VM in the same VRE will need to repeat these steps. The setting may apply to all conda environments.
I can’t see R: drive
You may need to manually map the R: drive to your machine.
- Open File Explorer and right click on Network
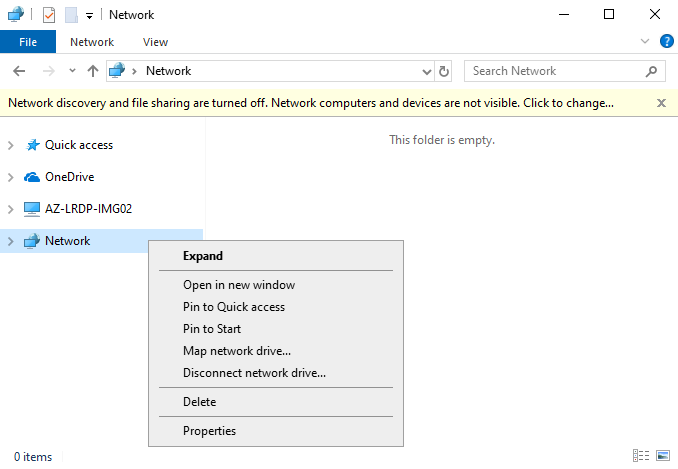
- Select ‘Map network drive’
- Drive = R:
- Folder = \\azlrdprepos.file.core.windows.net\r-repo
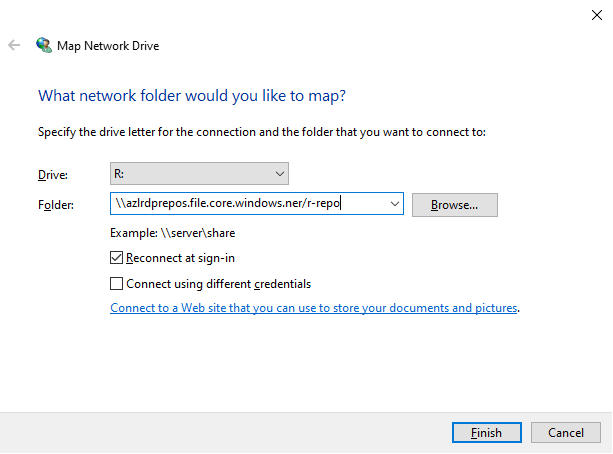
- Click finish
You should now see the R miniCRAN repository mapped to R: drive.
My software installation failed in Software Center
There is a known issue that with some software provided in Software Center, attempts to install the software end with Failed status and present an error message even when the installation is successful. This is known to occur with:
- Anaconda
- ArcGIS
- Atom
If you have tried to install these software and got an error message try looking for the software in your Start menu to see if the installation actually succeeded. If the software didn’t install, contact the Data Analytics Team at dat@leeds.ac.uk for support. In all other cases of software installation failures, contact the Data Analytics Team.
Where can I find the computational spec of my virtual machine?
See our guide to monitoring VMs using Azure Portal.
Why is my LASER desktop display a different resolution to the desktop I use to access LASER?
Windows often scales the display to make text larger and easier to read, altering the resolution displayed. By default, LASER displays VRE desktops at this scaled resolution rather than your monitor’s native resolution.
To run LASER VMs at the native resolution of your monitor:
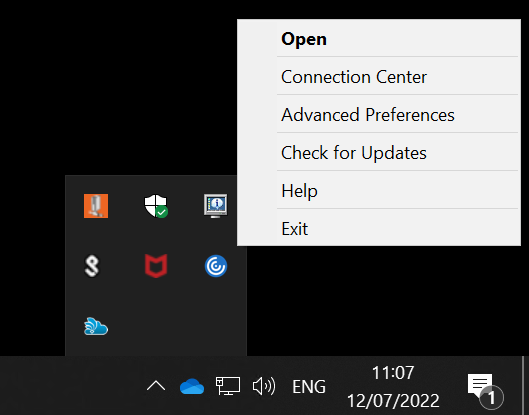
- Right-click the Citrix Workspace icon in the system tray on your taskbar, and select Advanced Preferences:
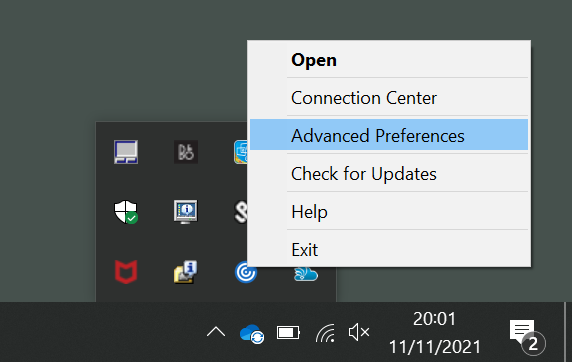
- Select High DPI, and then select and save the “No, use the native resolution” option:
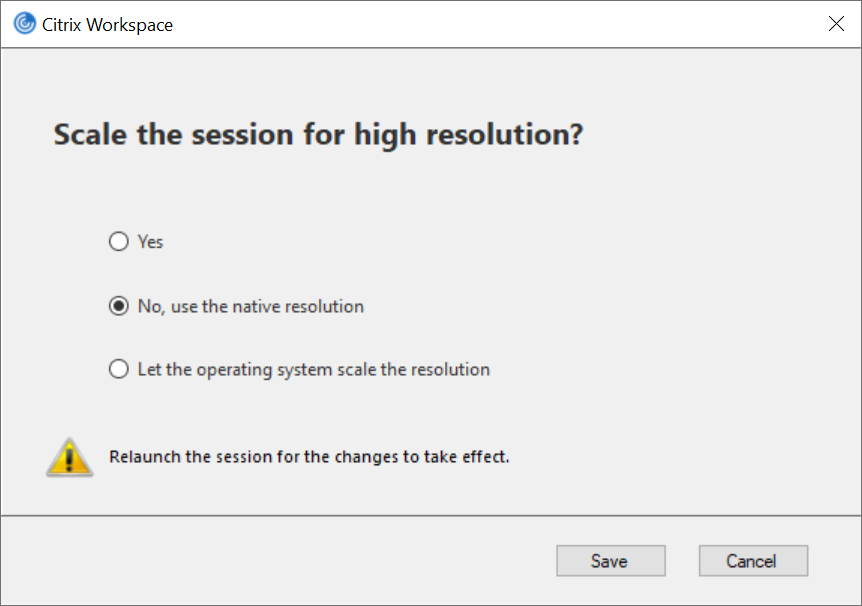
Your choice will persist in subsequent sessions.
How do I restrict folder access to specific project members?
See our instructions on how to request bespoke folder access permissions on your VRE’s N: drive.
There’s a cost discrepancy between Azure Portal & LASER Dashboard
A variance between the LASER Power BI Dashboard costs which come directly from Azure and the monthly IT finance costs may be seen, this is due to discounts and surcharges included in IT Finances calculations as part of a 3rd party supplier contract but not part of the raw Azure costs.
LASER login failure: You cannot log on using a smart card
Note: This issue has been fixed and should not occur any longer. Details will be kept here until we deem them no longer useful. If you experience this issue, email dat@leeds.ac.uk.
If you try to login to LASER after having timed out from a previous session, you may see the following message:

You can fix this by clearing browsing data up to and including the time since your last LASER login. Alternatively, avoid the error by opening a private/incognito window instead.